
Butternut squash is, type of winter squash, that grows well in summer. I could grow Butternut squash in containers with a decent harvest, even they require more space. So, growing butternut squash in containers is still a great idea if you have space limitations.
Here’s how to grow butternut squash in containers.
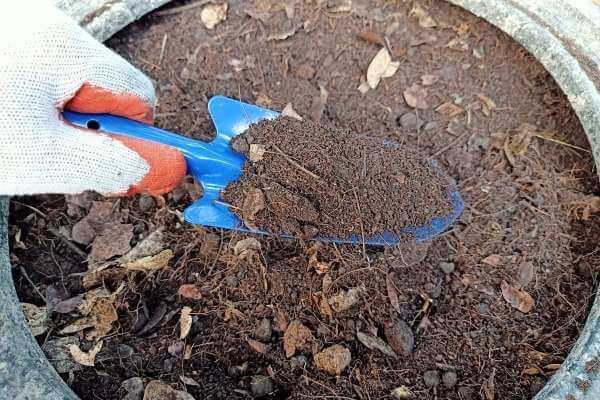
Find a 5-gallon bucket as the container and fill it with some good composts and organic matter as potting mix. Then sow or transplant butternut squash in early spring and locate the plant under direct sunlight. Water 2-3 inches a week, fertilize once a month, and give a stake supporting when plant start growing longer. You can harvest butternut squash in containers after 110-120 days.
Butternut squash has such a long growing period between 100-110 days on average, and they’ll produce a massive harvest at the end of the season.
To get the most out of the plant when you grow butternut squash in containers, you have to be extra careful about the container, potting mix, watering, and fertilizing. I cover them all for you today. Keep reading!
Table of Contents
Can you grow butternut squash in containers?
Butternut squash is a crop that belongs to the Cucurbits family. Even though Cucurbits family crops have large, extended roots, Squashes do not extend their roots that much.
So it makes growing butternut in containers more possible.
On the other hand, squashes are heavy feeders and thirstier. The right container and correct planting soil are what you have to focus on when you try growing butternut squash in containers.
But before I giving you the final answer, I have brought you some kind of interesting news about growing Butternut squash in containers.
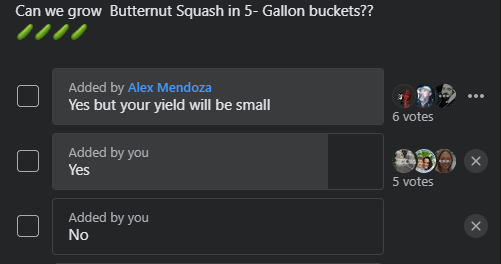
I interviewed Shawna Coronado, who is a popular gardening expert in the USA, and Gardening author on Amazon, and asked her “can we grow Butternut squash in containers?”
Here’s what she said.
You can absolutely grow Butternut squash in containers. A larger container is better (more than a gallon)
Shawna Coronado
So, if we summarise all the above information, we can get into a final decision of “Can you grow butternut squash in containers?”, as follows.
Butternut squash can be successfully grown in containers, by using at least 1 gallon or larger pot, with the correct potting soil with good enough nutrients. And the container should be located as it is exposed to 7 – 8 hours of direct sunlight.
Butternut squash varieties to grow in containers
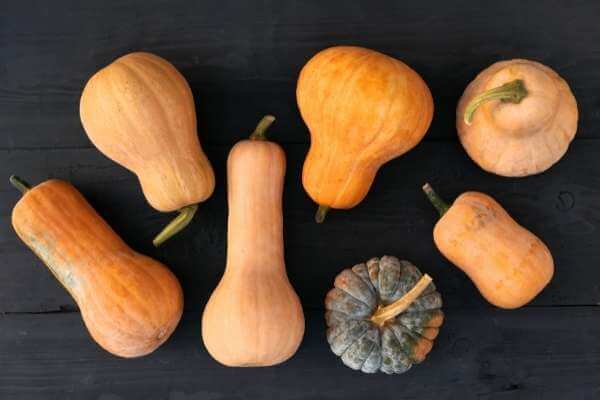
Butternut squash is one of the varieties of Squash. But you have to believe that butternut squashes are also having dozens of varieties.
Since all of those varieties are not supporting with containers, I’m going to help you with choosing the best butternut squash variety to grow in containers.
Waltham Butternut variety
This is the most commonly growing butternut variety in all parts of the world. These are vining plants and well suited for growing in containers since their average growing height is 0.93 m on average.
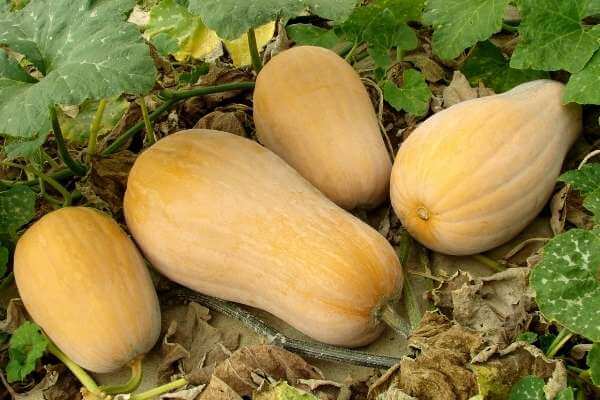
Waltham Butternuts are producing 2-3 pound fruits that usually look pale yellow to tan in color. And they could be a harvest for a long time because of the hardness of their skin.
They will be ready to harvest after 85 – 90 days from the seed sowing.
Autumn glow variety
As it sounds, Autumn glow is producing great harvests in containers that are glowing with golden yellow color.
Autumn glow butternuts are growing as short as 9 to 18 inches, which also makes them fit in containers than any other variety.
Crops are 8 inches long on average, and have more tendered fleshes, and taste slightly sweet. Autumn glow can be harvested after 80 – 85 days and can be stored for a long period of time.
Butter Boy hybrid variety
Butter boy hybrid is a massive variety of butternut squash, that has an extra sweetness of the fruits.
Averagely, the Butter boy hybrid produces 2.5 pounds of crops with reddish-orange flesh.
The reason this Butternut variety can be grown in containers, they are not growing more than 60 – 70 cm tall. And Butter boy is growing really well, once they are adapted onto a stake or trellis on a container.
Requirments to grow butternut squash in containers
As you already know butternut squash can be grown in containers. But to make them grow successfully, there are some requirements we should care about when growing butternut squash in containers.
I’m going to tell you all the requirements you need to fulfill when growing squash in containers. So you can make sure that your squash plants having comfortable growing in containers.
Container requirments
Choosing the right container is the most important factor you have to care about when you containerizing any kind of plant.
Because there aren’t any plants that are already adapted to be grown on a limited space like containers.
Every plant love to grow and extend without limitations of the space and soil. So we need to try our best to let the plant feel like it’s not growing in a space-limited container. 🙂
I ran many experiments for choosing the right container for growing butternut squash in containers. Here is what I founded.
Choosing the container to grow butternut squash in containers
I surveyed an audience that has so experienced growing squashes. And here’s what I found when I asked them what size container to grow butternut squash.
Here’s what I found.
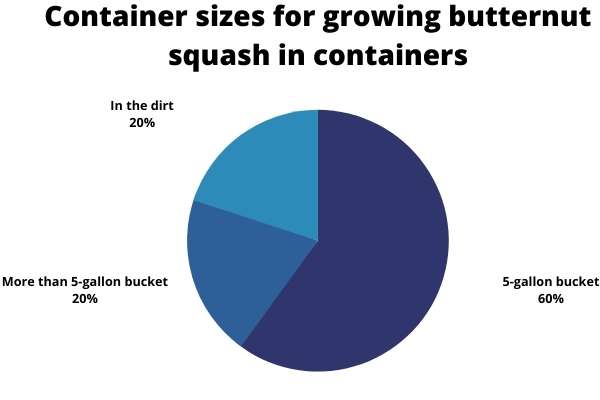
According to the survey, 60% of the gardeners were agreed that a 5-gallon bucket is the best container for growing butternut squash.
And 20% of them recommended using more than 5-gallon buckets to grow squashes, while the rest of 20% was likely to grow butternut squash in the dirt.
You know what, there wasn’t a single gardener that was recommending me to grow butternut squashes in less than 5-gallon buckets!!
Also, if I add my personal experience here, I was able to have the best yield when I was plant squashes in 22 inches wide, 11-inch tall baskets, after trying and experimenting with various container sizes.
Gardeningknowhow is also confirming it to me. 🙂
What should be the container size for growing butternut squash?
To grow butternut squash, the best container is a 5-gallon bucket that is 24 inches wide and 12 inches in height. A 5-gallon bucket will give the squash plant enough room to spread the roots and get wider, and encouraging the plant to produce large-sized fruits.

Now let’s find out what is the least recommended size for a container to grow butternut squash.
This is what Shawna Coronado said about squash plants and their required container sizes in our interview.
A larger container is better (more than a gallon), but the roots of the squash is not huge, just the top of the squash is so big,…
Shawna Coronado
I also have tried growing butternut squash in 2 and 3-gallon baskets. And I could harvest some squashes over 3 months period successfully.
But there was a problem.
My yield was very low when growing smaller containers when comparing with when I grew butternut squash in 5-gallon buckets.
Don’t just believe me. Some gardeners have found that their squash yield getting low even when they growing in 5-gallon buckets.
So here’s my final answer.
How small can a container be to grow squash?
A container can be small as 1 gallon to grow squash. But the squash yield will be getting proportionately lower when the container is getting smaller.
Care about the drainage of the container
This is one of a part that most of the beginners go wrong with. As Cucurbits family plants are way more sensible of root rot, you have to care about the water drainage system of the container you’re using to grow butternut squash.
If you’re willing to buy a new container, check whether it has drainage holes in the bottom of the container.
Now if you don’t see any drainage holes in your container, you’ve to drill four drainage holes from four sides.
I would like you to drill not the bottom, drill 2-3 inches above from the base of the container. It will help to retain the moisture of the soil for a bit longer.

Considering all of the above factors, I found the best container for growing butternut squash for you. And that’s a 5 -gallon bucket that has proper drainage facilities, which you can buy on Amazon from here.
Can you grow butternut squash in grow bags?
You can grow butternut squash in grow bags until the grow bag is larger than 1 gallon. And make sure that it has a good potting mix with enough nutrients, and good drainage to drain water and make the soil well-drained over time.
Growing butternut squashes in grow bags is a great idea rather than just sticking with traditional containers.
Soil requirments for butternut squash
Because all the Squash varieties are being heavy feeders, butternut squashes are expecting a lot from the soil.
Butternut squash needs well-drained, rich, sandy loamy soil which is slightly acidic as much as 5.8 to 6.5 Ph.
Because you are growing butternut squash in a container, you can easily prepare and adjust the soil according to the required Ph and nutrients.
Here are some of the tips on how you need to care about the soil when you are growing butternut squash.
- As butternut squashes need well-drained soil, check the moisture of the soil every 2-3 days by putting your finger into the soil.
If there is unnecessary moisture for a long time, you have to work on draining it, otherwise, the roots are more likely to getting rot. - If you are using a large quantity of your garden soil to grow butternut squash in containers, it’s better to perform a soil test using a cheap soil tester if you don’t have any clue about the Ph level of your garden soil.
- You can make the garden soil more acidic by amending composts, coffee grounds, organic mulch, and adding food scraps, which will make squash plants love to grow.
- Don’t use your garden soil directly on containers if they are heavier like clay. Mix some sand and organic matter before using them on the container. It will make the soil light and loose.
Watering Butternut squash in containers
As squash is a crop that grows in summer, watering is so essential part of growing your butternut squashes on containers.
And also when you growing them in containers, they may require more water than usual.
Even squash needs the well-draining quality of the soil, squash plants are love to grow up when they feel evenly moist on the soil.
How much water does butternut squash need?
On average butternut squash need 2 inches of water a week to thrive, when they’ve planted in the ground. The average water requirement for growing butternut squash in containers is 2.5 inches per week.
But surely you may have to increase the watering when they facing to dry spells in the mid-summer.
I have surveyed experienced gardeners and asked “how often do you water your container squashes?”.
Here’s the data I got back, and I was so surprised when I saw their consistency of watering.
| Consistency of Watering Container Butternut Squash | Percentage of Gardeners |
|---|---|
| Once a day | 51.42% |
| Every 2 – 3 days | 20% |
| Once a week | 14.29% |
| More than once a day in hot weather | 14.29% |
While I running this survey, I have done quick research on the web to find how often to water butternut squash.
In most of the sources, they have recommended watering the butternut plants twice or three times a week.
But in this case, because all of these gardeners are growing butternut squash in containers, 51.42% of them are recommending watering the squash plants every day.
Here’s the reason to have a huge difference within those numbers.
When you growing something else in a container, because it has less surface of the soil, the water drains quickly.
That’s why gardeners using more water when they’re growing squashes in pots, rather than in the ground.
Fertilizing Butternut squash in containers
When we talking about fertilizing butternut squash in containers, the most efficient nutrients they required are Nitrogen, potassium, and Prosperous, which we also called as NPK in gardening.
According to their nutrient requirement, the best organic fertilizer for butternut squash on containers is well-aged compost. And it has been used by many traditional gardeners, and they are doing great with their squash.
In fact, we can make it more grateful for the plant by making compost tea by letting some well-rotted compost store in a water bucket for 1 – 2 days.
It’s a fine homemade fertilizer for butternut squashes in containers!
Adding well-aged compost tea makes it easier for the roots to absorb nutrients. Therefore you’ll be able to see a fast growth of the plant.
As squashes are way hungrier than many other crops, you may have to fertilize butternut squashes on containers more often than the other crops in your backyard.
Personally, I fertilize my squash plants every two weeks when I grow them on the ground. But when I grow squash in containers, fertilizing them once a month will be enough.
Here’s a little chart with the consistency of fertilizing squash in containers and how many gardeners following them out of 100.
| Consistency of fertilizing container squash | Percentage of Gardeners |
|---|---|
| Fertilizing once a month | 50% |
| Fertilizing every 2 weeks | 33.33% |
| Fertilizing every week | 16.67% |
| Fertilizing every 2 months | 0% |
Commercial fertilizers

Before start using any commercial fertilizer for container butternut squash, we need to look at, what would be the required NPK for them.
Usually, when we growing a hungry crop like squash in the traditional way, the key is using high nitrogen fertilizers in the growing season, which makes the plant sprout more green leaves and grow long stems, which will also increase the chances of production.
But when it comes to growing butternut squash on containers, the plant will not be comfortable if it has grown too many leaves and stems within that limited space.
So you have to use a balanced NPK fertilizer with a general amount of Nitrogen if you want to use commercial fertilizers on your container squashes.
According to the harvesttotable, the best NPK for container squash is 5-10-10.
Your butternut squashes will be so pleased if you could feed them with this great 5-10-10 low nitrogen fertilizer listed on Amazon, on their growing season.
Temperature & Sun for Butternut squash

Providing the required temperature and sunlight can do a big impact on a summer crop like butternut squash.
So let’s find out what are the required temperature and sunlight conditions to grow butternut squash in containers.
Temperature for butternut squash in containers
In any format of growing, butternut squashes are preferred to have 50 F – 90 F of air temperature within their growing season.
That’s why they are adapted to start growing in the early spring and to be harvested in the fall.
Butternut squashes require the warmness of the soil throughout their growth as much as 65 F – 70 F.
For the germination of their seeds, they required the soil temperature to be 70 F on average according to Cornell University.
Butternut squash will ripen their fruits once the temperature rises as high as 100 F.
Butternut squash sun requirments
Butternut squashes needed plenty of direct sunlight throughout the day to grow the plant.
Butternut squash required full sun throughout the day to grow well. The minimum sunlight requirement for butternut squash is 7 hours of direct sunlight per day. The plant should be located in an open area that is getting sunlight directly without shade.
If you are going to grow butternut squash indoors, which I’m not recommending, you should have to locate it close to the windowsill to get enough sunlight, or you must use a powerful grow light.
How to grow Butternut squash in containers
Now we are going to see the exact step-by-step process to start and grow butternut squash in containers. When you know the main required conditions such as watering, fertilizing, and soil it’s pretty easy to continue growing squash.
Let’s jump in.
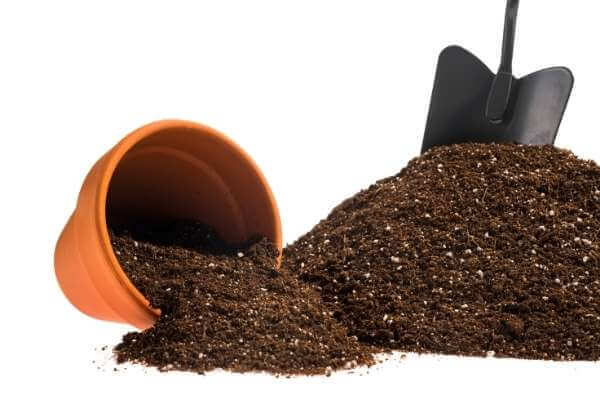
1. Find a container and prepare the potting mix
First, gather the right container for planting. (a 5-gallon container as my recommendation)
Now you have to start preparing the potting mix. And this is the soil that you are going to grow butternut squash in containers.
Therefore preparing the potting mix is a crucial part of this process, because it has to contains all the required nutrients and the required qualities to grow butternut squashes successfully.
How to prepare the potting mix for container squash
In my point of view, straightly filling the potting mix into the container would be the best way that we could prepare the potting mix, rather than preparing all of the potting mixes at once.
In my experience, we could well-manage and layering the soil on the container, when we follow this method of preparing the potting soil.
Here are the exact steps.
- Fill the bottom of the container with a mulch
- The reason you should use a mulch on the bottom of the containe is to retain the moisture for a long time on the container.
In this case I’m using hardwood mulch, and they’re doing a pretty good job on retaining the moisture for me. Wood chips are also rwally good for the bottom of the container.
Filling the bottom with 1 inch of mulch would be enough.
- The reason you should use a mulch on the bottom of the containe is to retain the moisture for a long time on the container.
- Then use some vegetable garden fertilizer above the mulch layer
- Usually, when the mulch keep mixing with the soil, they impact badly for the nutrients of the soil.
The soil will be going to lose its nutrients when they’ve been contacting with the mulch for longer.
So I recommend you to add another thin layer of vegetable garden soil on the top of mulch, to stop the above soil contacting with them.
- Usually, when the mulch keep mixing with the soil, they impact badly for the nutrients of the soil.
- Now add a layer of compost mixed garden soil
- In this step, you have to fill in compost mixed garden soil or a commercial potting soil as a 5-6 inch layer to the 5 gallon container.
- In this step, you have to fill in compost mixed garden soil or a commercial potting soil as a 5-6 inch layer to the 5 gallon container.
- Add some garden lime or any natural calcium source on the top of the compost layer
- Now add some garden lime or any kind of natural calcium containing stuff onto the potting mix.
The reason we are doing this, is to load the potting mix with full of nutrients to the plant. Calcium is always helping squashes with their rooting system.
Eggshells is an amazing natural source of Calcium that you can use.
- Now add some garden lime or any kind of natural calcium containing stuff onto the potting mix.
- Top it off until 3 inches from the top with garden soil or organic matter
- You have to fill the rest space on the 5 gallon container until 3 inches from the top with garden soil or organic matter.
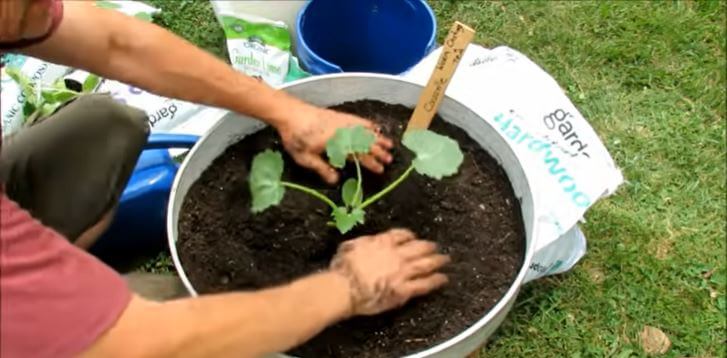
2. Sow the seeds or transplant them on the container
To grow butternut squash in containers, you can either sow seeds on the container or directly transplant them on the container.
Knowing when to start butternut seeds will allow you to the most out of the growing season.
When to start butternut squash seeds in container?
You can start the butternut squash seeds and grow anywhere, it has 100 – 120 days of the growing season until the frost.
Butternut squash seeds have to start on the container in the early spring when the outdoor temperature start clipping 60 F. You can also start seeds indoors 2 weeks before the last frost date and transplant butternut squash in the container when the spring started.
Sow the seeds or transplant squash in container?
For growing butternut squash in containers, should you sow seeds directly on the container, or transplant them on the container?
When you sow squash seeds in a container you have to work on providing the right conditions to germinate. But when you transplant squashes directly to the container plants can grow up right from the beginning, and also squash will save almost 2 weeks from the growing season when they’ve transplanted.
Therefore, transplanting is the method I recommend you to use when growing any squash in containers.
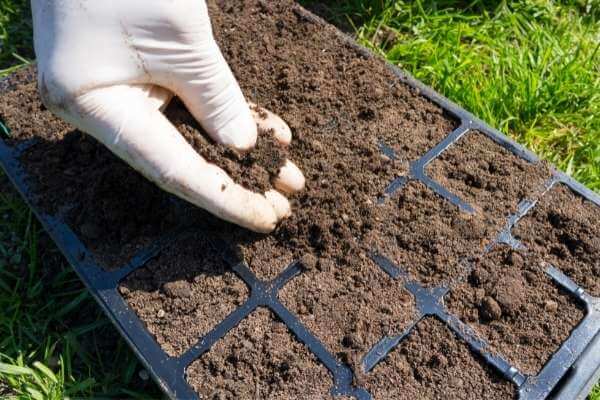
You can make your own squash transplants on your own by sowing on seed trays indoors, or squash transplants can be brought from the nearest garden center in the spring.
How to sow seeds or transplant butternut squash in containers?
Even though, I don’t hardly recommend sowing seeds directly on the container, here’s how to sow butternut squash seeds in containers.
- Wait until the potting soil reaches 70 F on the outside. You may have to stay a week to 10 days in the early spring to make this happen to the soil.
- Then sow the butternut squash seeds in the container by digging a 2″ hole from your finger. Now add some water onto it.
That’s all you sow squash seeds in the container.
Let’s see how you can transplant butternut squash in the container.
Before transplanting the squash plant in the container, how to know that your butternut squash plant is ready to be transplanted?
Butternut squash will be ready to be transplanted once they get into 2-3 inches and sprouted at least 2 true leaves. On average this may take 2 weeks from the sowing.
Here are the steps to transplant squashes in the container.
- Dig a 2 -2.5 inch hole in the container.
- Take the squash plant out from the cup or seed tray, without harming the roots.
- Put the plant into the hole in the container. It’s fine to have all the stem above the ground, as squashes have no adventitious roots.
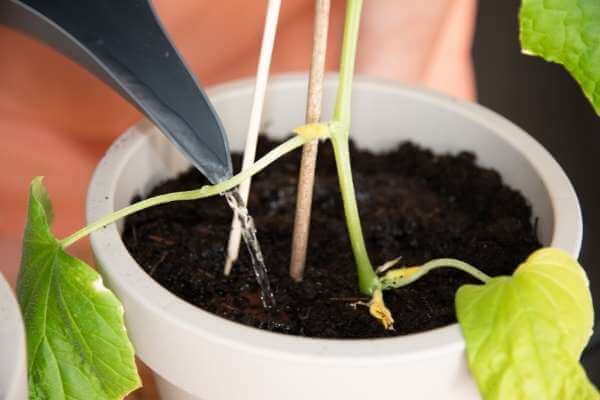
- Now give the plant a good drink with enough water.
3. Locate it on partial shade
After transplanting butternut squash in the container, clearly, the plant is having the transplanting shock because they have moved from one place to another.
So you shouldn’t expose the young butternut squash plant directly onto the hard and direct sunlight in the spring, which they actually loved to have.
Locate your newly transplanted container butternut squashes on partial shade for 10 days to 2 weeks.
It will help the plants to get their strength back from the transplanting shock. Also, keep up with good watering in this period.
99% times you could easily pass this period quite easily, but if the plant looks like it’s getting wilted after moving, add some Nitrogen or Calcium fertilizers on them.
It will give life back to the roots.
4. Use a mulch on the container
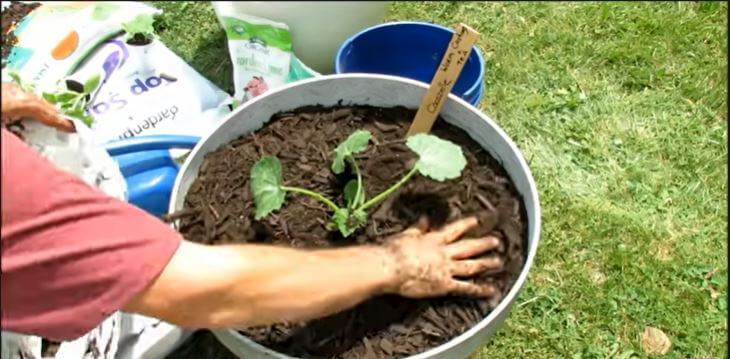
Using mulch on both container gardening and traditional gardening is giving us various advantages.
So using mulch when growing butternut squash in containers will be worth so much as they are recognized as a good summer crop.
Here are some advantages the squashes will have from mulching in containers.
- Retain the moisture for long on the soil.
- Keep the weeds out
- Add more nutrients to the soil
- Can work as a fertilizer
Mulching is the reason why I said you to top off the container 3 inches below from the top.
For butternut squash in containers, use 1.5 to 2 inches of mulch from on the top of the soil.
Hay, straw, and grass clippings are perfect mulching options for the top of the soil on the container for squash.
5. Start supporting when they start growing stem
Now you have to work on supporting the butternut squash plant in the container, as it starts vining.
When to support squash plant in the container?
Vertical grow supporting should have to start for container squashes, when the plant is getting to 5-6 inches and starts growing its stem. Once you adapted a vining squash plant from the very beginning of its growth, it can be easily run vertically in a container.
How to support the squash plant in the container?
Follow these methods to support your butternut squash plants in a container.
The easiest way to support container growing squash is staking. The only thing you have to do is pointing two stakes vertically, close to the plant, and wrapping the stems when your squash plant starts growing.
In the beginning, watch them carefully and wrap them to the stake when they trying to run away. They will be naturally adapted to the stake after some weeks.
6. Move them into direct sunlight when they grew up
Once you planted or sow butternut squash in the container, you have to keep the container in partial shade for 10 days to 2 weeks as I mentioned above.
So as the next step of growing butternut squash in containers, you have to move the container to an open area that getting enough direct sunlight.
Usually, your butternut squash plant will be 5-6 inches in height, when it’s ready to expose to direct sunlight.
7. Keep regular watering and fertilizing in the growing season
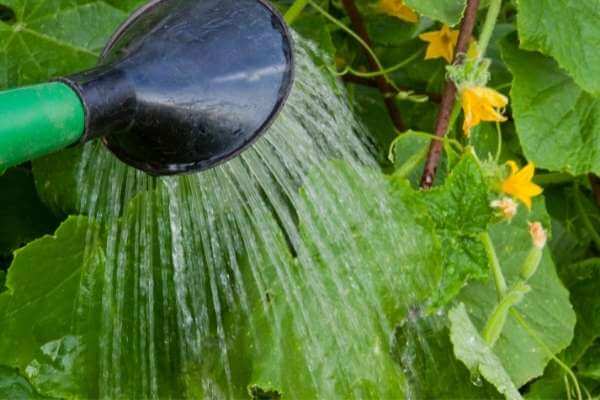
Once you give the plant enough sunlight to thrive, all you need to do for growing butternut squash in containers is, following a regular watering and fertilizing routine throughout the growing season.
You have to feed nutrient-rich fertilizers, such as compost and organic matter. If you’re going with commercial fertilizing, a 5-10-10 low Nitrogen fertilizer would be most effective when growing butternut squash in containers.
On average, butternut squash has to be fertilized every month when they’re growing in containers.
When considering watering, you have to provide at least 2 inches of water a week for your squash plants.
On average, you have to water the butternut squash plants once a day. And even you may have to work on watering twice a day on dry spells in summer.
8 . Prune butternut squash at the right time
After you promising your squash plants for regular watering and fertilizing, pruning them is one thing you could do to make them more healthy and productive.
When to prune your butternut squash in containers?
Here’s when you should prune butternut squashes.
- When your butternut squash get infected by powdery mildew on the end of summer season.
- When there are yellowed and big leaves in the end of the growing season. They will distract the fruit setting process.
How to prune Butternut squash in containers?
Take a sharp pruning scissor and prune it away from where the leaf is attached to the stem. If you’re pruning diseased leaves, wash and clean the pruning scissor every time you pruned an infected leaf. Burn all the diseased leaves you’ve pruned. Don’t let them contacting with the plant again.
The below video will help also you with pruning squash plants.
9. Harvest your lovely butternut squash in containers
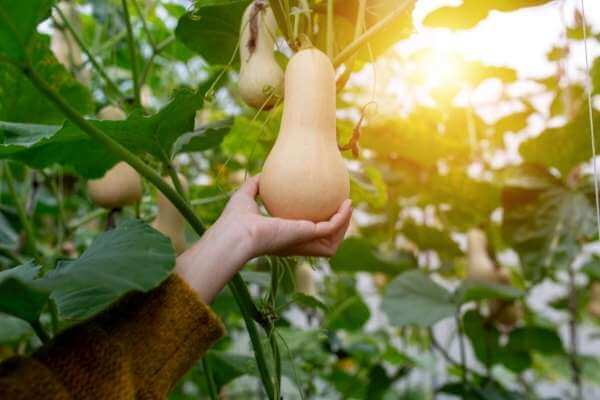
Usually, when you grow butternut squash in containers, you will be able to harvest the fruit in early autumn to mid-autumn.
But how long after you can harvest butternut squash in containers? how many days it will take?
For letting you know the best answer, I surveyed a bunch of gardeners about it. Here’s what I found.
| Days took to harvest butternut squash | Percentage of gardeners |
|---|---|
| Less than 90 days | 0% |
| 90 – 100 days | 17.64% |
| 100 – 110 days | 29.41% |
| 110 – 120 days | 41.18% |
| More than 120 days | 11.76% |
According to the chart, the highest percentage of gardeners have harvested butternut squash in containers, 100-120 days after planting them.
Only 17.64% could harvest butternut squash less than 100 days.
when to harvest butternut squash in containers?
Averagely butternut squash takes 110-120 days to be harvested from their planting date. The butternut squash should be between 8-12 inches long, and the skin of the fruit should be shiny.
When the plant arriving the harvesting season, be sure you watch the top of the butternut squash which is attached to the main stem.
Sometimes it’s likely to split. If it got split, the moisture will sneak in the tend the fruit to rotten. On that occasion, you have to harvest the fruit early.
Watch carefully underneath the big leaves, otherwise, you will miss some fruits until they rotten off.
It’s better to harvest butternut squashes constantly as squashes produce more fruit when you pick more of them.
Caring Butternut squash in containers
As you are going to grow butternut squash in a small place like a container, It always worths knowing about caring for them in containers.
Basically, you can pull off any weeds that sprouting out on the soil inside the container, to care for the health and nutrient level of the soil. And also you can do cutting off dead and yellowing leaves from the vine.
Apart from those, there are many other things you can implement to care for butternut squash plants when growing them in containers.
Pollinating butternut squash in container
All squash varieties including butternut squash aren’t self-pollinators. They grow male and female flowers separately in the same plant.
When we growing butternut squash in containers we should really care about pollinating, because only the female flowers are producing fruit.
The most important thing is, butternut squashes aren’t blooming many female flowers if the weather becomes too cold or too hot.
Butternut squashes can be naturally pollinated through pollinators and by the wind even they are growing in a container.
But hand-pollinating is always boosting the yield as it’s a great method to pollinate the flowers successfully.
Hand pollinating butternut squash in containers
In the process of hand pollinating your squash flowers, all you have to do is taking out pollens from the male flower, and depositing them on the stigma of the female flower.
But before you get into hand-pollinating butternut squash, you have to identify the male and female flowers of them correctly.
Identifying the male and female flowers of butternut squash
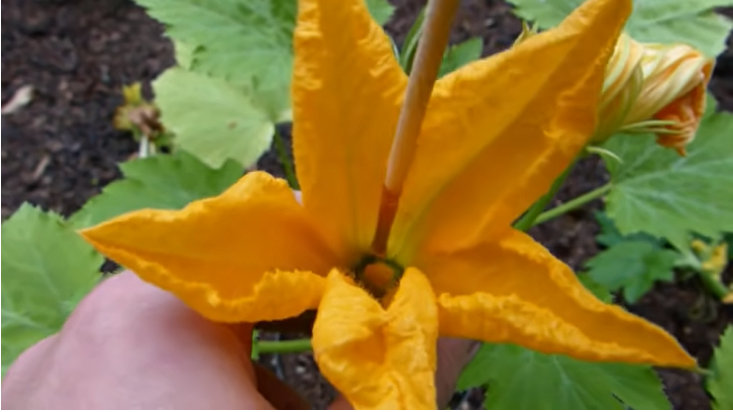
A male butternut squash flower can be easily identified as it has a straight stem behind the flower, and it hasn’t got any swelling behind the flower.
Inside the male flower, there is a little part that pointing to the outside, which is called the Stamen. And it carries the pollen grains, which we are going to deposit on the female flowers.
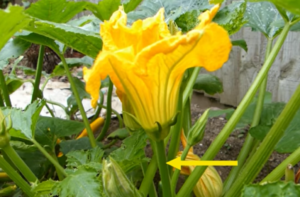
A female flower can be easily identified as it has a swelling behind the flower. And that swelling will become the fruit after the flower is being pollinated.
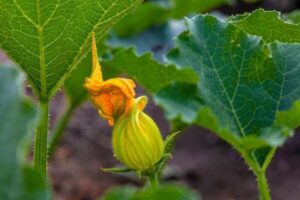
There is a part called stigma in the female part. That is where the pollen grains should be deposited.
Here are 3 methods you can hand pollinate butternut squash flowers.
- The easiest way that you could hand polinate a buternut squash plant is by giving it a gentle shake. It will allow the plllen grains to release from male flowers and fall on female flowers.
- You can hand pollinate your container growing squash plant easily by using an artist painting brush. First collect the pollen grains to the paint brush, from the stamen of the male flower.
Then replace those pollen grains on the stigma of the female flower. Now you’ve done the hand pollinating! - Another way to hand polinate squash flowers is by picking the male flower and directly mixing up pollen grains onto the stigma using the flower.
Pests diseases and fixes for Butternut squash in containers
When you’re growing squash in containers, you’ll have the advantage of low pest attacks. That’s because you’re growing the plant above the ground level.
But still, they are in danger from insect-type pests. So here are some kinds of pests diseases that may happen when growing butternut squash in containers.
Squash bugs
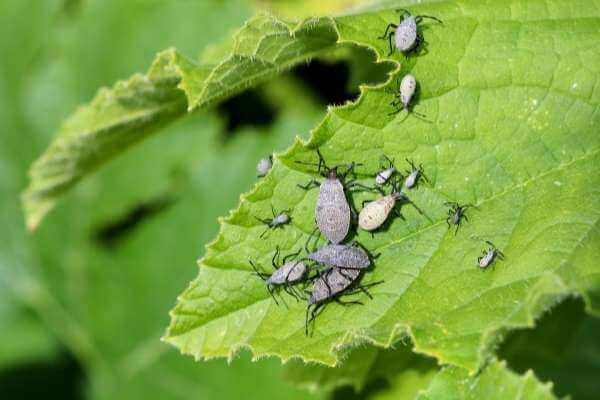
Squash bug is the most common pest disease when growing any kind of squash variety.
Those squash bugs are weakening the plant and distracting to fruit production.
Most of the case, they are active in the early summer. The easiest way to prevent their harm is, covering the plant with kind of a cloth which is do not block the sunlight.
And don’t forget to check whether they have laid new eggs under leaves and stems at least twice a week.
Squash vine borers
Squash vine borers are known as one of the main enemies for squashes.
Luckily these vine borers can’t see that much often in Butternut squashes. But still, they are possible to attack butternut.
Not sure? I found this comment rarely from a gardener when I posted about butternut squash pest diseases.

Vine borers are also active in early summer.
Usually, they pierce the stem and lay their eggs inside the stem. Thereafter the stem will start to rot, and the leaves are starting to wilt.
The easiest way to prevent them is by using a cover on the plant. So they won’t have the chance to get into the plant.
Also read: Is wood ashes good for insect repelling on plants?
Plant diseases and fixes for growing butternut squash in containers
Even there are dozens of plant diseases that can be infected with squash plants, they will have a low risk of getting infected by diseases when you’re growing them in containers.
Because you can easily control the conditions as it is required.
But still, there is a common issue that getting off when you are growing butternut squash in containers, or even in the ground.
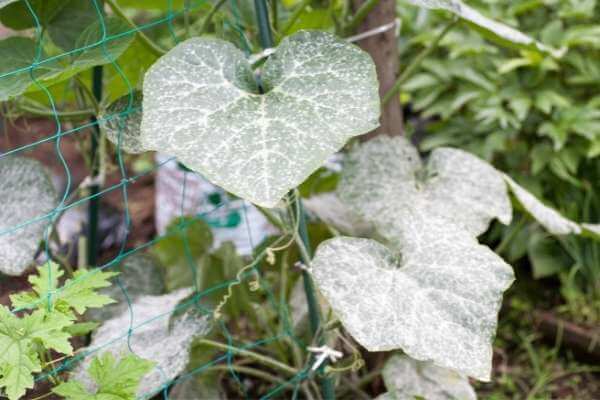
That is powdery mildew disease.
You can easily identify powdery mildew by observing a white powder/layer on the leaves. It works as a sunlight blocker and the leaves will lose their efficiency of photosynthesis.
Powdery mildew is often happened on butternut squashes and many Cucurbit plants causing irregular watering, lack of sunlight, and lack of air circulation.
Usually, this powdery mildew disease commonly occurs on squashes in early or late summer.
- If your container-grown butternut squash has infected powdery mildew, first cut off the infected leaves. Keeping them can promote the disease.
- To prevent this, spray the leaves with a solution of water and milk mixture, which is in 2:1. You have to spray it in the morning. Repeat it every 10 days.
Related:- Homemade fertilizers for money plant